Kubernetes Spec
This section provides the kubernetes configuration of the application. You can view the kubernetes configuration of the application and change the configurations per environment.
You can read more about the SkyU Kubernetes Spec in Kustomize Transformer section.
To directly edit the spec, open Edit YAML in the top right corner of the page. This will open the spec in the editor where you can make changes to the spec.
Containers
The containers section provides the container configurations of the application. This is configured for you at the creation of the application automatically. However, you can add more containers to your application depending on your requirements.
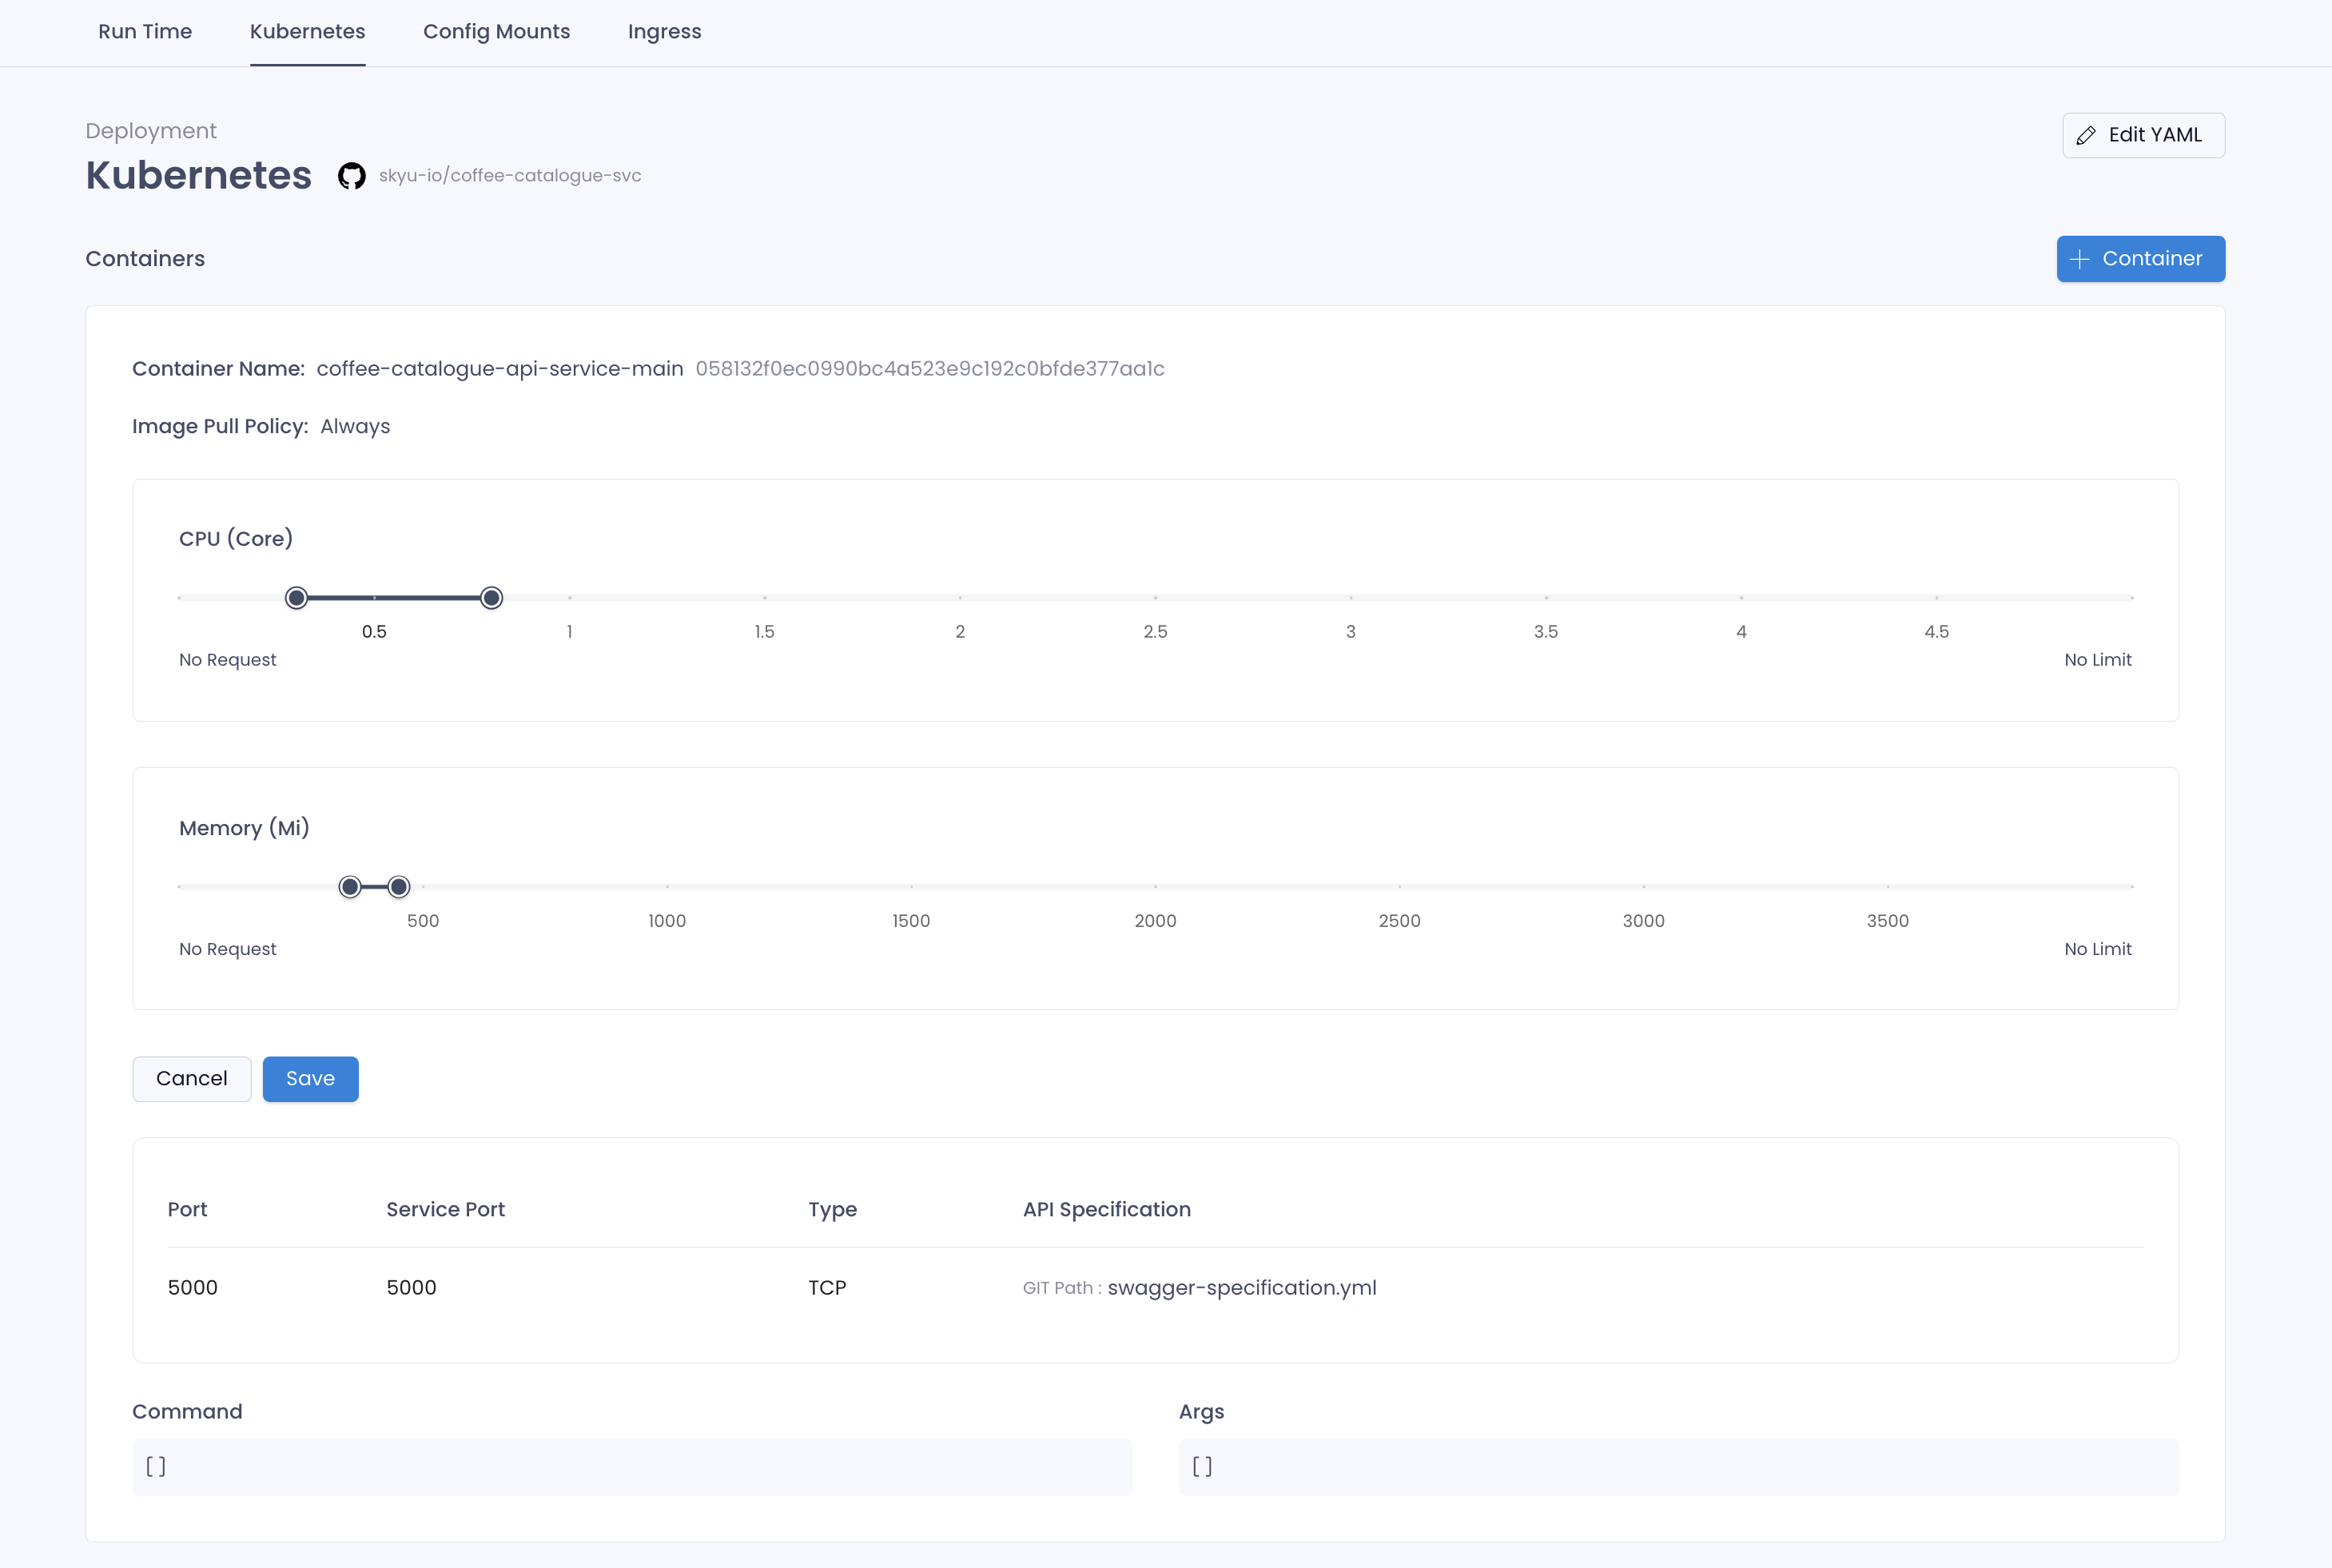
The Slider enables you to update the resources allocated to the container. You can update the CPU and Memory allocated to the container by sliding the slider.
Left corner of the slider gives Request value and right corner gives Limit value.
Following is the container configuration of the application.
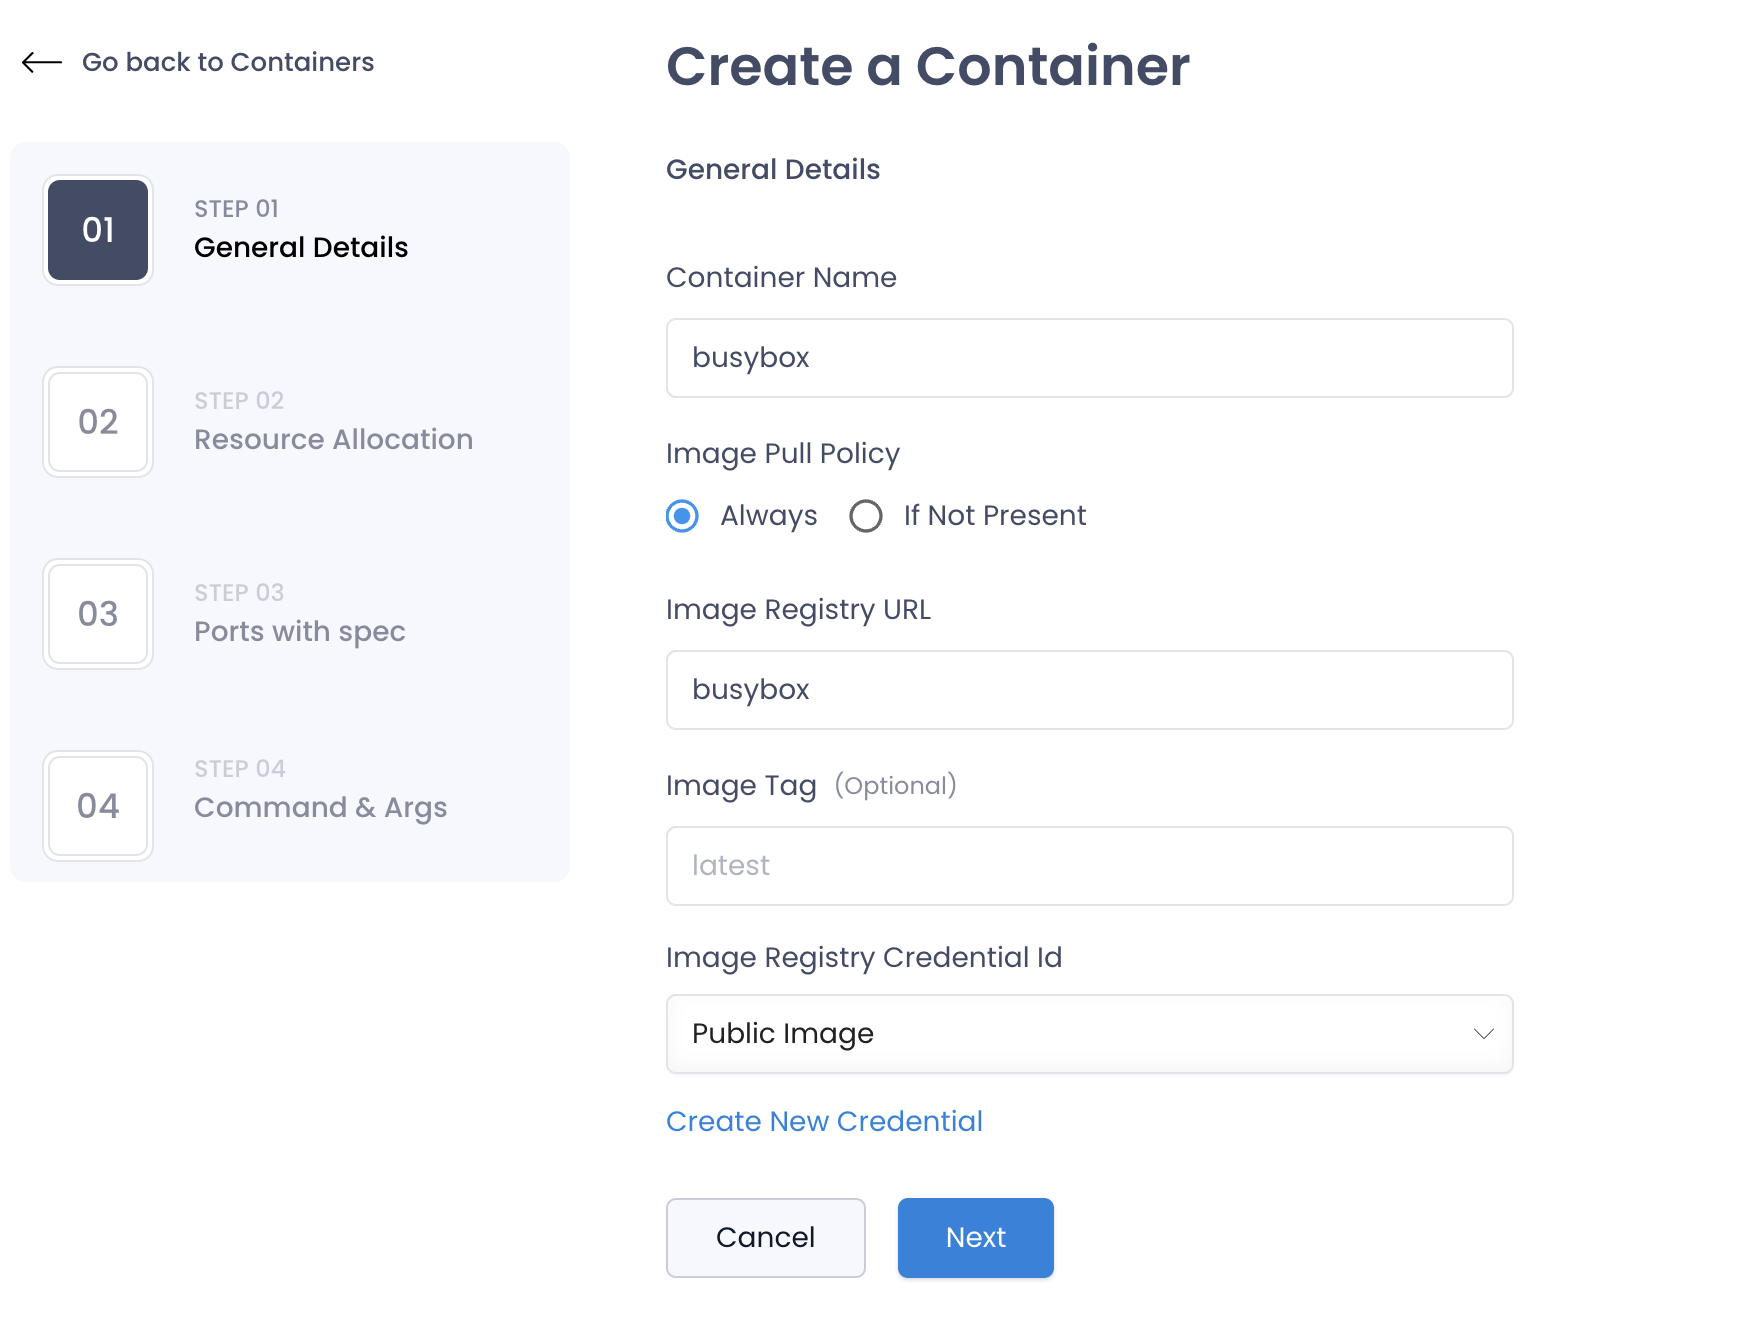
Container Details
- Click on the
Create Containerbutton. - Fill out the container details.
| Field | Description | Example |
|---|---|---|
| Name | Name of the Container. This has to be unique across your application and should not contain special characters. | busybox |
| Image Pull Policy | Always would pull the image always when a pod starts up. IfNotPresent will only pull the image if it is not available in the kubernetes node | Always |
| Image Registry URL | The URL of the image registry where the image is stored. | busybox |
| Tag | The tag of the image. This is the version of the image that will be used to create the container. | latest |
| Image Registry Credentials | The credentials to access the image registry. If it's not a public image please refer Integrations to add a credential | public |
| Init Container | If the container is an init container. This is a boolean value. Init Containers are used to run setup tasks before the main container starts. This is useful when you want to run a task before the main container starts. | false |
Resource Allocation
You can allocate resources to the container by specifying the limits and requests for the container. This will ensure that the container does not consume more resources than allocated.
| Field | Description | Example |
|---|---|---|
| CPU Request | The amount of CPU allocated to the container. This is in millicores. | 100m |
| Memory Request | The amount of memory allocated to the container. This is in bytes. | 100Mi |
| CPU Limit | The maximum amount of CPU that the container can use. This is in millicores. | 100m |
| Memory Limit | The maximum amount of memory that the container can use. This is in bytes. | 100Mi |
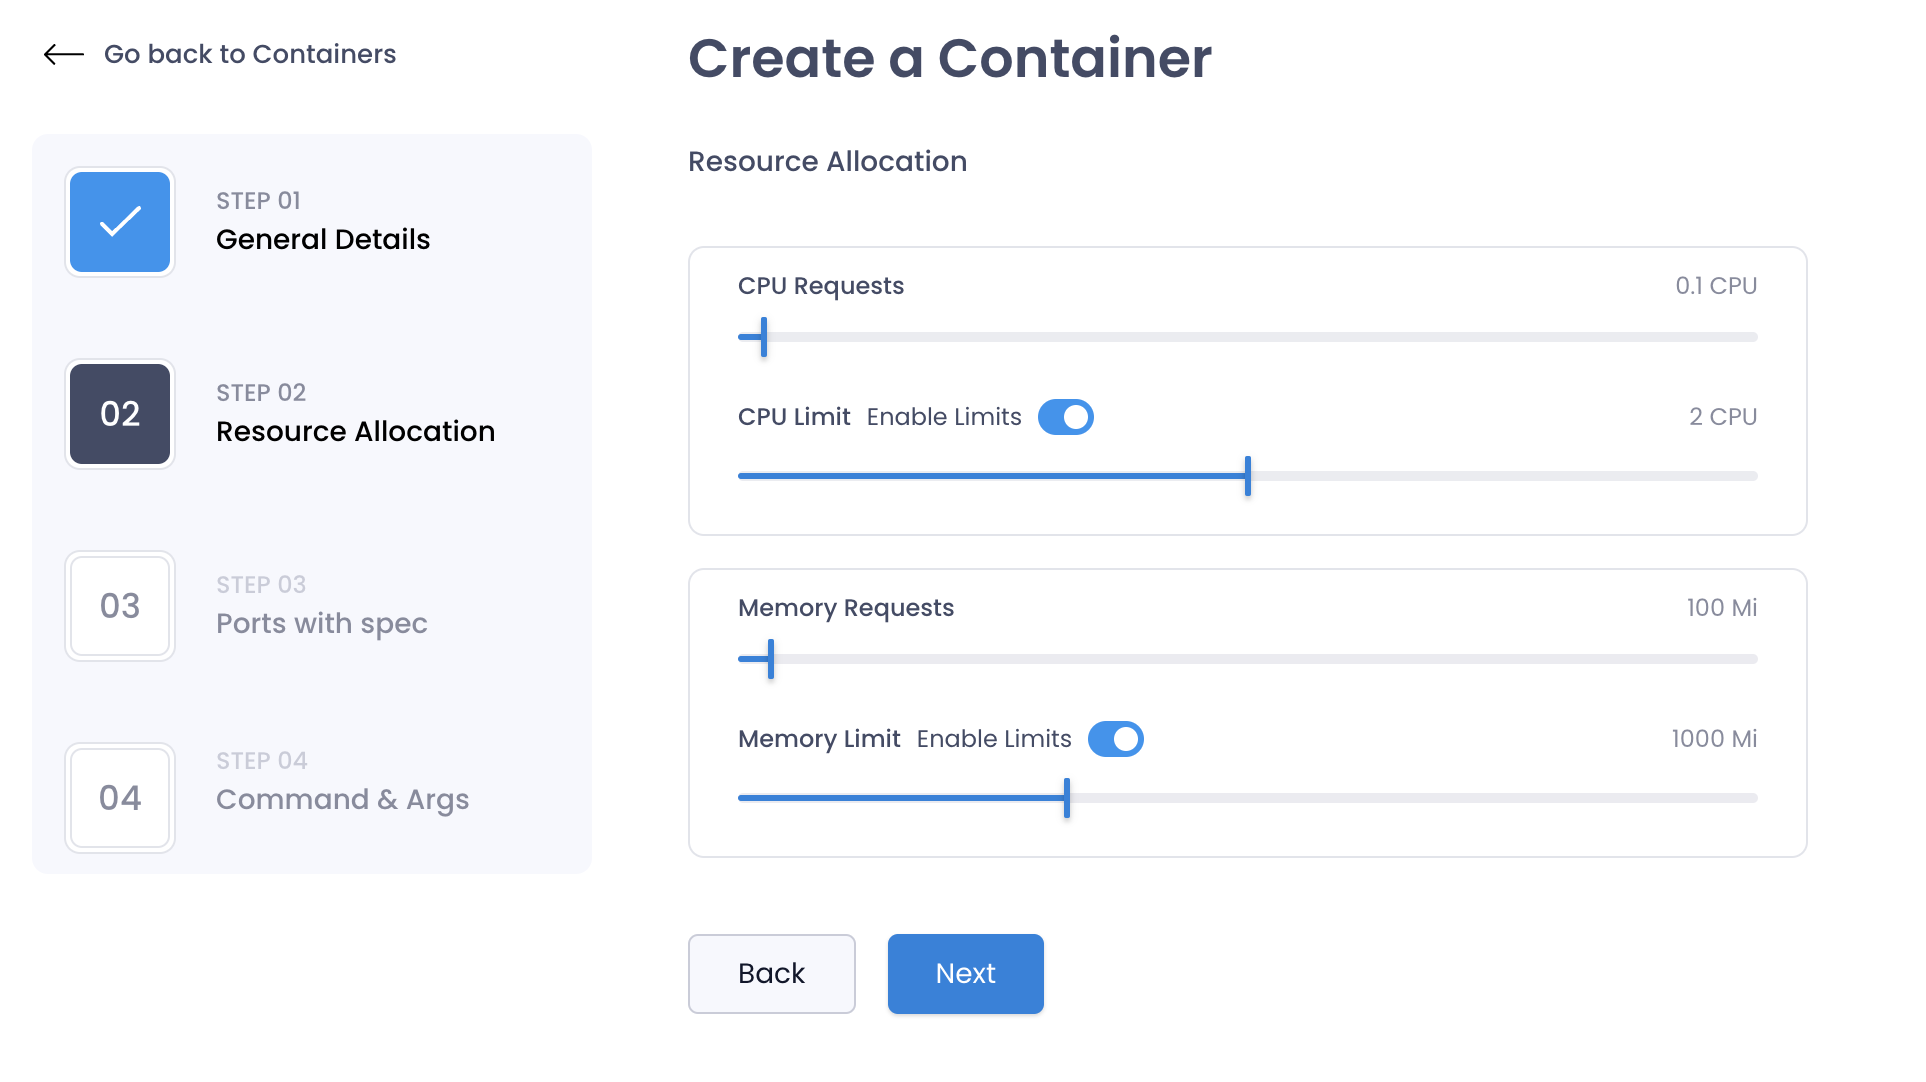
You can disable limits for the container by toggling the switch. This will allow the container to use the resources as needed.
Be mindful when having a huge difference between the request and limit values. This can lead to performance issues in the cluster. Generally, the request value should be equal to the limit value or about 20% less than the limit value.
Port Specification
You can specify the ports that the container will listen on. This is useful when you want to expose the container to the outside world.
| Field | Description | Example |
|---|---|---|
| Port | The port number that the container will listen on. This is a numeric value. | 80 |
| Service port | The port number that the service will listen on. This is a numeric value. | 80 |
| Protocol | The protocol that the port will use. This can be either TCP or UDP. | TCP |
Ideally Port and Service port should be the same. However, you can specify different ports if needed.
Command and Arguments
You can specify the command and arguments that the container will run when it starts up. This is useful when you want to run a specific command when the container starts.
- Command: The command that the container will run when it starts up. This is a string value. This will override the default command defined in the Dockerfile.
- Arguments: The arguments that the command will use when it runs. This is a string value. This will override the default arguments defined in the Dockerfile.
If your dockerfile has an ENTRYPOINT defined, only the arguments will be overridden. If the dockerfile has a CMD defined, the command and arguments will be overridden.
Health Checks
Health checks are used to determine the health of the container. This is useful when you want to ensure that the container is running as expected.
There are three types of health checks that you can configure for the container.
- Liveness Probe: This is used to determine if the container is running. If the liveness probe fails, the container will be restarted.
- Readiness Probe: This is used to determine if the container is ready to accept traffic. If the readiness probe fails, the container will not receive traffic.
- Startup Probe: This is used to determine if the container is ready to accept traffic. If the startup probe fails, the container will not receive traffic. This is used to delay the readiness probe until the container is ready to accept traffic.
In SkyU, you can put the same configuration for all 3 at once or create seperate configurations for each.
The following are the configurations for the health checks.
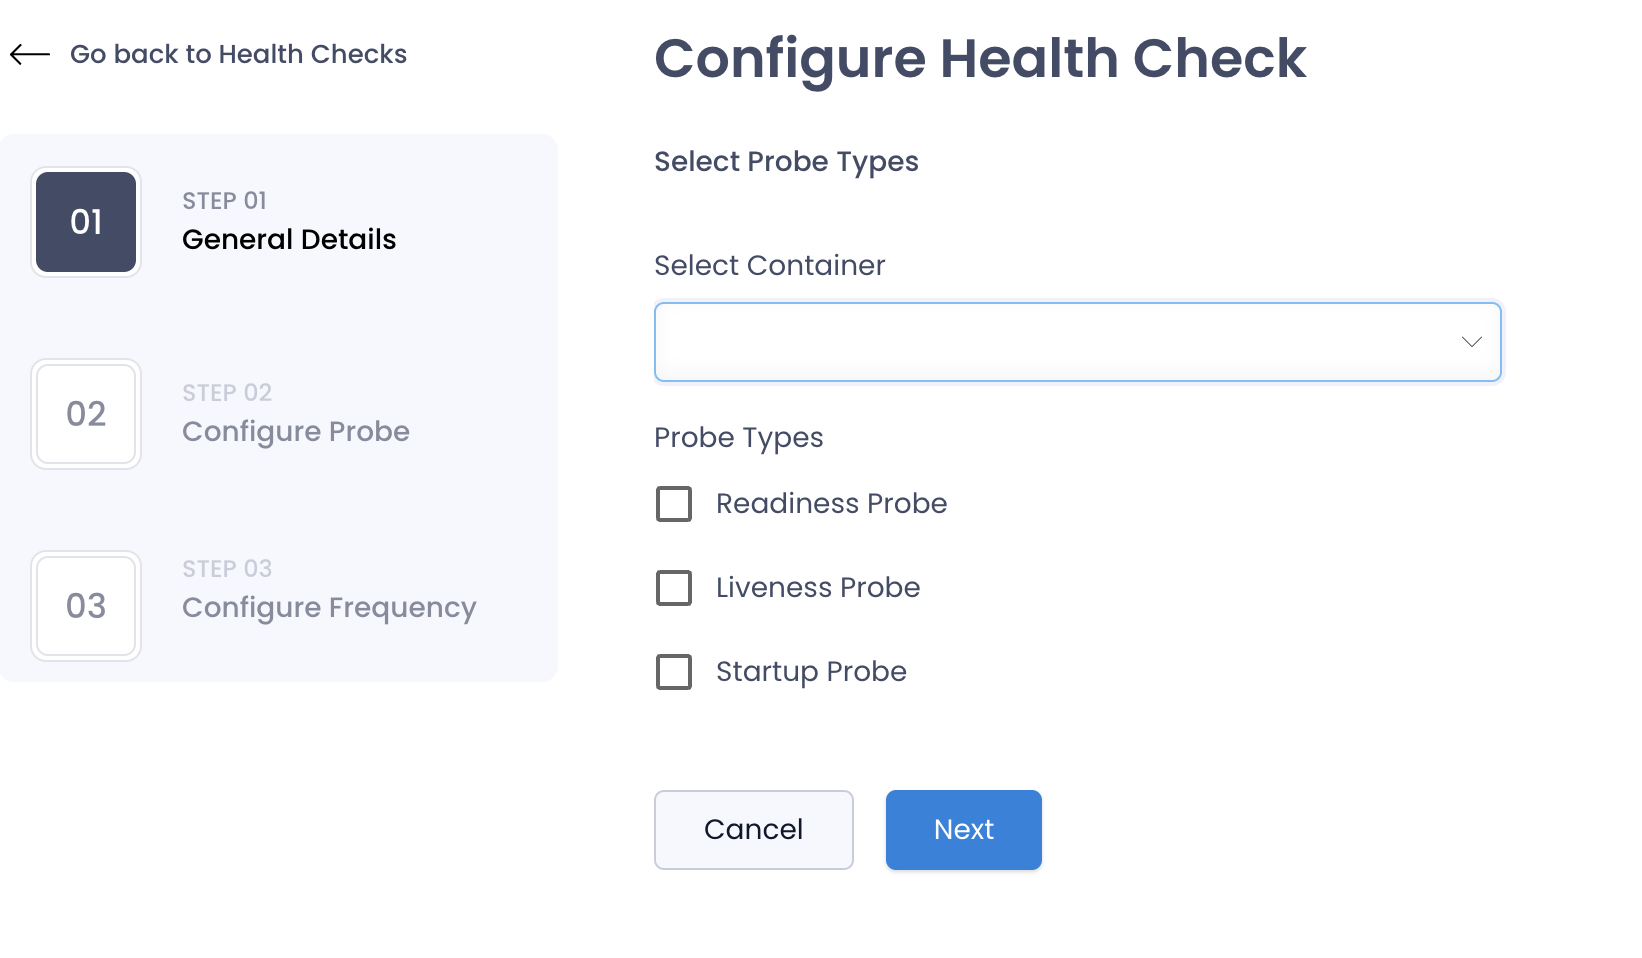
General Details
Select the container for which you want to configure the probe and select the types of probes you want to configure.
Configure Probe
You can configure how the probe will check the health of the container in this section.
You have the following options to configure the probe.
HTTP GET Request
This is used to determine the health of the container by making an HTTP request to the container. This only supports GET requests.
| Field | Description | Example |
|---|---|---|
| Path | The path that the probe will request. This is a string value. | /health |
| Port | The port that the probe will request. This is a numeric value. | 80 |
| HTTP Headers | The headers that the probe will send. This is a list of key-value pairs. |
TCP Socket
This is used to determine the health of the container by making a TCP connection to the container.
| Field | Description | Example |
|---|---|---|
| Port | The port that the probe will request. This is a numeric value. | 80 |
Command
This is used to determine the health of the container by running a command inside the container.
Configure Frequency
You can configure how often the probe will check the health of the container in this section.
| Field | Description | Example |
|---|---|---|
| Initial Delay | The amount of time to wait before starting the probe. This is in seconds. | 10 |
| Timeout | The amount of time to wait for the probe to complete. This is in seconds. | 5 |
| Period | The amount of time to wait between probes. This is in seconds. | 15 |
| Success Threshold | The number of successful probes required to mark the container as healthy. | 1 |
| Failure Threshold | The number of failed probes required to mark the container as unhealthy. | 3 |
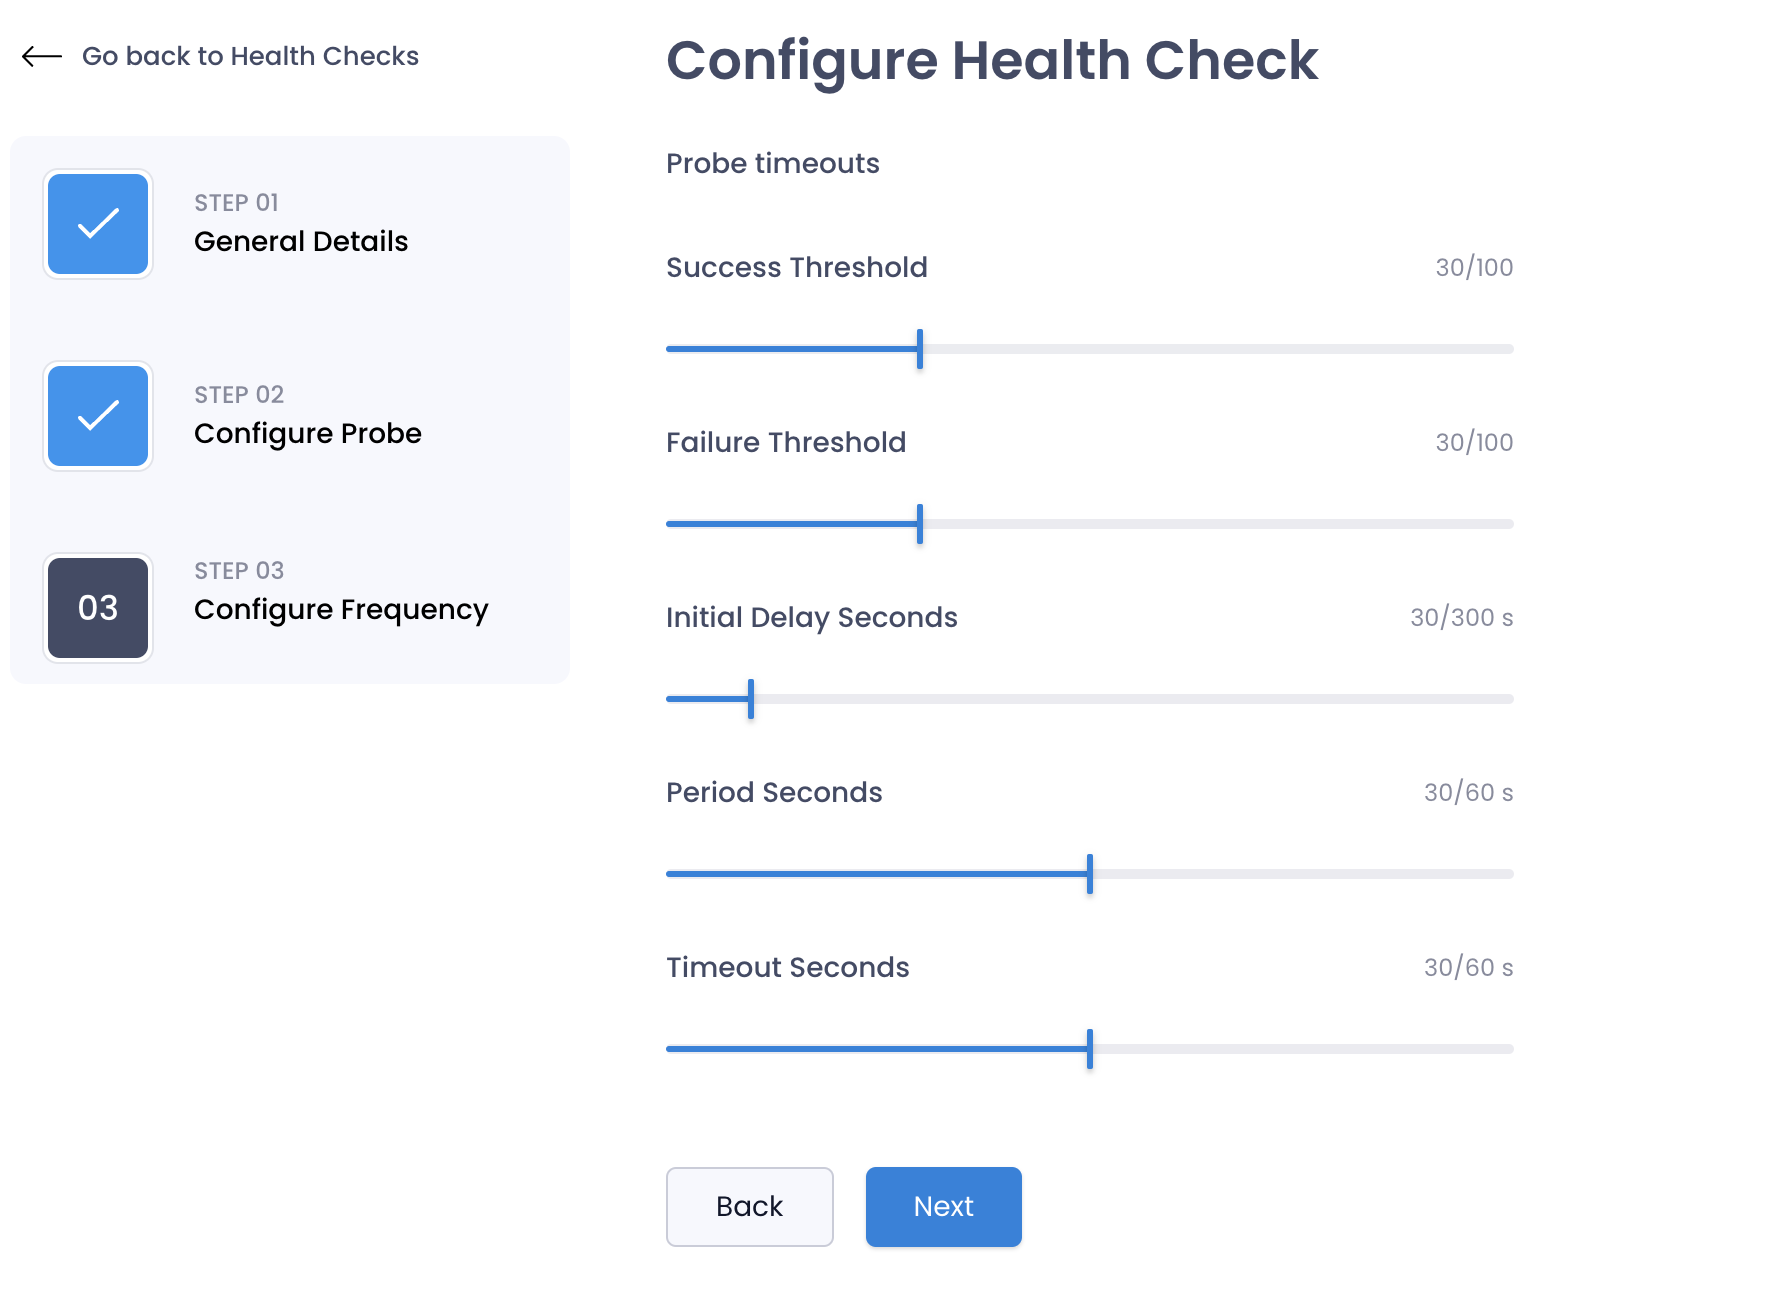
If your container goes into a crashloop, or health check starts failing you can increase the Initial Delay to give the container more time to start up before the probe starts.
Scaling
SkyU supports Kubernetes Horizontal Pod Autoscaler (HPA) to scale the application based on the resource utilization. You can configure the HPA for the application in the scaling section.

If you want to scale the application based on the resource utilization, you can configure the following fields.
| Field | Description | Example |
|---|---|---|
| Min Replicas | The minimum number of replicas that the application will have. | 1 |
| Max Replicas | The maximum number of replicas that the application will have. | 10 |
| CPU Utilization | The target CPU utilization percentage that the application will scale on. | 80% |
| Memory Usage | The target Memory Usage the application will scale on. | 500Mi |
If you simply want to increase the number of replicas without any scaling, you can do so by updating the min and max number to be the same under scaling.
Service Account
You can configure the service account for the application in the service account section. This is useful when you want to give the application specific permissions in the cluster.
Refer to the Service Account section for more information on service accounts.
Volume Mounts
You can configure the volume mounts for the application the Kubernetes Spec. Click Edit YAML at the top right corner of the page and edit the spec with relavent volume details.
Following is an example of volume mounts in the spec.
  volumes:
    - name: "app-volume"
      type: "pvc"
      pvc:
        claimName: "app-pvc"
        yamlFilePath: "path/to/pvc.yaml"
      volumeMounts:
        - containerName: "app-container-1"
          mountPath: "/data"
There are few volume types that you can use in the spec.
EmptyDir
EmptyDir is a temporary storage that is created when a Pod is assigned to a Node. It exists as long as the Pod is running on that Node. When a Pod is removed from the Node for any reason, the data in the EmptyDir is deleted forever.
EmptyDir is useful when you want to share storage / data between containers in the same pod.
  volumes:
    - name: "app-volume"
      type: "emptyDir"
      volumeMounts:
        - containerName: "app-container-1"
          mountPath: "/data"
        - containerName: "app-container-2"
          mountPath: "/data"
Persistent Volume Claim
Persistent Volume Claim (PVC) is used to request storage resources from the cluster. The storage resources are provisioned based on the storage class and the storage capacity requested in the PVC.
Persistent Volume Claim is useful when you want to store data that needs to persist even after the pod is deleted. Make sure to have a storage class configured in the cluster.
Most PVCs are ReadWriteOnce, meaning they can only be mounted to a single node. If you need to share the volume between multiple nodes, you can use ReadWriteMany or ReadOnlyMany PVCs.
Please create a PVC under GitOps in the environment before referring them in the spec. UX for this is coming soon.
  volumes:
    - name: "app-volume"
      type: "pvc"
      pvc:
        claimName: "app-pvc"
      volumeMounts:
        - containerName: "app-container-1"
          mountPath: "/data"
NFS
NFS is a network file system that allows you to mount a remote file system on your local machine. You can use NFS to mount a remote file system to your pod. This is ReadWriteMany by default.
This is commonly used with deployments that need to share data between multiple pods.
  volumes:
    - name: "app-volume"
      type: "nfs"
      nfs:
        server: "nfs-server-ip",
        path: "/path/to/nfs"
      volumeMounts:
        - containerName: "app-container-1"
          mountPath: "/data"
HostPath
HostPath is used to mount a directory from the host node's filesystem into your pod. This is useful when you want to access the host node's filesystem from the pod.
HostPath is useful when you want to access the host node's filesystem from the pod. This is not recommended in production environments.
  volumes:
    - name: "app-volume"
      type: "hostPath"
      hostPath:
        path: "/path/to/host"
      volumeMounts:
        - containerName: "app-container-1"
          mountPath: "/data"